Get In Touch

Latest Post

Add Meta Description Tags to Blogger

Written By Unknown on Saturday 8 September 2012 | 22:52


Add Meta Description Tags to Blogger


Meta Tags are HTML elements used to provide structured metadata about a web page. Such tags are placed in the head section of an HTML document and Search Engines might use this data to display the search snippet when they display a page from your blog. Most of the Social Sharing Tools like the Facebook Share or the Google Plus buttons will pick up this meta description to create the snippet which gets shared to the Social Networks.
 

How to add Meta Description Tags

Blogger has rolled out an array of SEO features and now adding Meta Tags has become so easy. You can do it easily from the Blogger’s User Interface without doing much of Template Editing or pulling your hair. So here is how to do it
  1. Go to Settings Search Settings and Enable Meta Tags. In the Text area give a 150 character description which will describe your Blog. This text might be used by Search engines when your Blog’s home page is displayed on Search Engines. Here is the snippet that I have given “Blogger Widgets provides you the best quality blogger tutorials.It also provides you with free blogger widgets and  gadgets to build a better blog.”Meta Tags For Blogger
    Meta description Tags displayed on Google
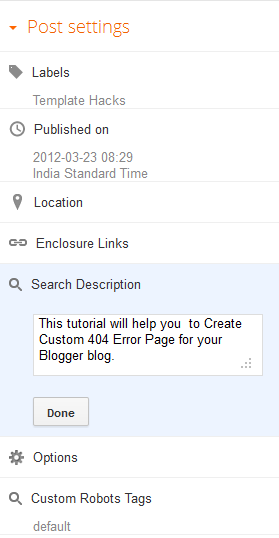
  2. Now when you make a Post, you can set the Meta Description from the Post Editor’sPost Settings  Sidebar.Meta description Tags For Blogger
    You can always edit the Search Description for existing posts as well
  3. If you are having a custom template, make sure that the following line of code is present in your template. To do that go to Template and Proceed to Edit HTML .Find
    <b:include data='blog' name='all-head-content'/>
    If it's not present, add it just before </head>
  4. That's It you have done it.

Custom Permalinks for Blogger Posts


Custom Permalinks for Blogger Posts


A permalink (or permanent link) is a URL that points to a specific blog entry after it has passed from the front page to the archives.Blogger generates this permanent link based on your post title(If the title is in English). For example if your post title is “Hello World”, the blog post’s permalink would be something like http://yourblog.blogspot.com/2012/06/hello-world.html   Till date Blogger never allowed the user to control what the permalink should be but it rather assigned a permalink on it’s own.
This has now changed and Blogger now allows YOU to decide what the permalink of your new post should be.
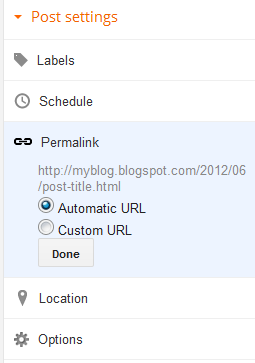
This feature is currently available in Blogger’s Draft Version. So if you would like to check it out, head straight over to http://draft.blogger.com and create a new post. In the post options you will see a permalink option.
image
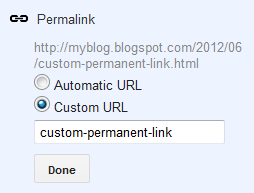
If you select the “Automatic URL” (the default option), then Blogger will generate the permalink on it’s own. If you want to specify a custom URL, opt for the “Custom URL” option and you can enter your custom post permalink over there. It will allow you to enter alphabets, hyphens and underscores. It will just ignore underscores. So I just used a combination of hyphens and alphabets to create my post permalink
image

The Final Permalink will be something like
http://yourblogaddress/yyyy/mm/the custom URL that you specified
In my case it came to something like
http://myblog.blogspot.com/yyyy/mm/custom-permanent-link.html
Blogger doesn’t allow you to modify the Permalinks of old posts but you can make use of this new feature on your new posts  There seems to be no limit to the length of this Custom URL at the moment but Blogger might impose some length limit in future.

Redirect one page to another in Blogger


Redirect one page to another in Blogger

Blogger has launched an Array of Search Engine related features and one of them is the ability to create Custom Redirects. Technically Blogger allows you to create 302 Redirects which are used to specify that the Web Page has temporarily moved to a new location.

What is a redirect ?

A visitor coming to a particular web address is redirected to another web address. This process is called Redirect. Blogger allows you to create Internal Redirects which means that you will be able to redirect the user coming to a particular URL on your blog to another URL on your Blog.

When are Blogger Redirects Useful?

Consider a situation where a page on your Blog was really popular and later you decided to delete it for some reason. Since that page is popular, references to that URL might be there at multiple Blogs/Websites which linked to you. The users coming to that popular URL will now be greeted with a 404 Page not Found Error. You might be loosing some potential readers/subscribers here. One way of resolving this would be to redirect the guy to some other relevant page. This is exactly what Blogger’s Custom Redirects do.
You can also use the Blogger Redirection Tool to create short links. For example you might want to redirect yourblog.blogspot.com/yourname to  your contact page. You can do that easily using the Blogger’s Redirect Tool.

How to add Redirects?

I will describe this using an Example. I had a post about Meta Tags on my Blog. This entry was made some 4 years back  and when Blogger launched the new Search Options, it became irrelevant. So I just deleted that post and made a new entry in my Blog with the new details. Now the visitors coming to that 4 year old URL from various sources would be greeted with a 404 error. I don’t want that to happen but I need that user to be sent to my new Blog Post.
  1. To do a Redirect you should have 2 URLs. The first one is the URL which should be redirected to the target. The target is the second URL where the user should be redirected to.
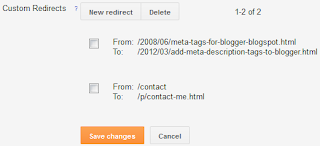
  2. The second thing that you have to do is to get the relative paths of these URLs.e.g.: The relative path to http://www.bloggerplugins.org/2008/06/meta-tags-for-blogger-blogspot.html is  /2008/06/meta-tags-for-blogger-blogspot.html . You might have already figured out that you should remove your Blog’s home page URL from the URL to get the relative path. You should also make sure that the Relative path starts with a slash (/)
  3. Similarly you have to figure out the relative path to the Target URL. I opted for/2012/03/add-meta-description-tags-to-blogger.html
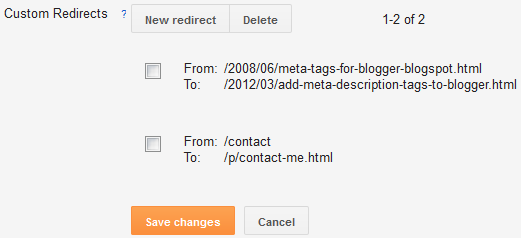
  4. Once you have got these 2 Relative paths, you can do the Redirect at Settings >Search Preferences > Errors & Redirects > Custom Redirects Add the From and To Fields there and click on the Save link and then on the Save SettingsButtonCustom Redirect Settings Blogger
  5. You can add more Redirects in a similar way.

Demo

Check out the following URLs and see how these get redirected
  1. A Post which is no longer there http://www.bloggerplugins.org/2008/06/meta-tags-for-blogger-blogspot.html 
  2. A Custom Short URL that I made http://www.bloggerplugins.org/contact
Both of these URLs will get redirected to a different page instead of showing a 404 Page.

Recent Comments Widget with Avatar for Blogger/Blogspot


Recent Comments Widget with Avatar for Blogger/Blogspot


Recent Comments widget with Avatar for Blogger Blogs. Recently Blogger updated the Comments API for Threaded Comments on Blogger . In this widget we can show the Avatar of Commenter using the updated the Comments API. as you seen my Recent Comments Widget, this is looks exactly same to my Recent Comments Widget. 
In this Widget i included the Comment Excerpts and Avatar Image. you can choose default Anonymous Avatar Image also.
Preview:-
Recent Comments Widget with Avatar for Blogger/Blogspot

HOW TO INSTALL RECENT COMMENTS WIDGET WITH AVATAR?

it’s Pretty simple as Always. 1, 2, 3 … Done!
  1. Click the “Widget Generator” Button
  2. Customize the Settings as you need and Click the “Generate” Button
  3. Finally Click the “Add to Blogger” Button. :D
I hope you enjoyed with this widget.
Feedback’s and Suggestions are welcome!. Please Drop a Comment and Don’t forget to share this Widget with your friends. :)

Static FaceBook Pop Out Like Box WordPress Plugin


Static FaceBook Pop Out Like Box WordPress Plugin


Introducing the Static Facebook Pop Out Like Box for WordPress with smooth jquery hover effect. Today I am delighted to release my first WordPress Plugin ready to download and integrate onto any WordPress site, best of all it’s totally free and easy to set up. TheBlogger version of this Facebook Pop Out proved so popular i decided to write this WordPress version 1.0 complete with lots of user options so you can customize the Position, width, height and Colors with ease. A great way to grow your Facebook fans find the demo, download and instructions below.
Settings page

PREVIEW

DOWNLOAD

Download Facebook Pop Out Like Box WordPress Plugin

INSTALLATION

  1. Download the Plugin here
  2. Navigate to Plugins > Add New > Upload
  3. Select and Upload the .zip file.
  4. Activate the Plugin.

USAGE

  1. Go to Facebook Pop-out Likebox Settings page Under the Settings tab.
  2. Enable the Facebook pop-out likebox.
  3. Enter your Facebook page URL.
  4. Customize the Other Settings and Click the Save Changes Button.
I hope this is very useful for your WordPress blog to grow up your Facebook fans.
I would like to say a Huge thanks to Paul Crowe and Sujith Kumar for their kind of support.
and I will release the New updated version of Facebook likebox for blogger very soon.
Please leave your comments and Questions below.

How to Add jQuery Nivo Slider to Blogger Blog


How to Add jQuery Nivo Slider to Blogger Blog

Many of way2blogging readers requesting a awesome and easy to use image slider. before i given a simple jquery slider, which is something difficult to add slides and use. Today i am giving the World’s most awesome jQuery slider. which is jQuery Nivo Slider. jQuery Nivo Slider is free to use and it is offering great setting options to customize your slider, and it is very easy to use with my Widget Generators.

NIVO SLIDER FEATURES

  1. 16 unique transition effects
  2. Simple clean & valid markup
  3. Loads of settings to tweak
  4. Built in directional and control navigation
  5. Packed version only weighs 12kb
  6. Supports linking images
  7. Keyboard Navigation
  8. HTML Captions
  9. 3 Slick Themes
  10. Free to use and abuse under the MIT license
For more Information Visit the Nivo Slider website

PREVIEW

WATCH LIVE PREVIEW

HOW TO INSTALL JQUERY NIVO SLIDER IN BLOGGER?

Here are the Two simple steps to add the Nivo Slider to your Blog.
Please keep in mind, All the Slide images widths and Heights Should be Same, and those are match with the Slider Script Width and Height.
For Example:- I taken the Width and Height as 640px and 300px Respectively. Then all my Slide images width and Height MUST be 640px x 300px. Then only Slider works AWESOME!. :D

INSTALLING THE NIVO SLIDER SCRIPT

Here is the Generator for the Nivo Slider Script.
  1. Just Customize the settings as your need and Generate the Code.
  2. Copy the Nivo Slider Script and paste it before </head>
GENERATE SCRIPT

ADDING NIVO SLIDER

Here is another Nivo Slider Slides Generator.
  1. Add any Number of Slides and insert the Valid Image URL(required) into each Slide.
  2. You have the options to add the links and Captions to each slide, and you can also sort them by dragging it, at top of each slide.
  3. Generate the Nivo Slider and Click the Add to Blogger button
  4. After adding the Widget Drag the Nivo Slider Widget where ever you want to show the Slider.
GENERATE SLIDER
If you Enjoyed with this Awesome Slider, Please Share this Tutorial.
Please leave your comments and suggestion to improve this slider more on blogger platform. :)

CHANGELOG

26/06/2012
+ Updated Nivo Slider Script Version to 3.0.1
+ Fixed Bugs in Slider.

Add Dynamic Pinterest Pin It Button For Blogger / Blogspot


Add Dynamic Pinterest Pin It Button For Blogger / Blogspot

Pinterest is a new social networking site where you can share the awesome images found in the web. Pinterest is an online pin board where you can pin web photos/images and the images are displayed on Pinterest with a link to the source page of the image. Your friends and followers can re-pin(share) your image to their Pin Boards making your image and the post on your blog containing the image go viral. Pinterest is the fastest growing and one of the top social networks on the Web. By add the Pinterest Pin It button to your blog, your readers can easily Pin the article images to their Pin Boards and you will get a good amount traffic from Pinterest.
As the title says this is a Dynamic Pin it Button. which will first grabs the image from settings. if it is not available not available, then it will pull the first image from the article. If there no image found in the Article then it take the Default image from settings, and it also adds a Description from the post with 500 characters (max length on Pinterest).

HOW TO ADD THE PINTEREST PIN IT BUTTON TO BLOGGER?

ADDING PIN IT SCRIPT FOR BLOGGER

  1. Login to Blogger Dashboard > Choose your Blog and Click the More Options Dropdown
  2. Select the Template > Click on Edit HTML > Proceed
  3. Check/Tick the Expand Template Widgets checkbox
  4. Search for </head> and place the below code before it!
    <script type="text/javascript" src="http://bloggerblogwidgets.googlecode.com/svn/trunk/w2b_blogger_pinit.js"></script>

ADDING PIN IT BUTTON SCRIPT

  1. Search for <data:post.body/>
  2. Place the Bellow Pin It Button script before or after it
    - If you add the below code before the <data:post.body/> then it will appear the Before the Post Content.
    - If you add the below code after the <data:post.body/> then it will appear the After the Post Content.
    <b:if cond='data:blog.pageType == &quot;item&quot;'> 
    <div expr:id="&quot;w2bPinit-&quot; + data:post.id" style="display: none;visibility: hidden;height: 0;width:0;overflow: hidden;" class="w2bPinitButton"> 
     <data:post.body/>
     <script type="text/javascript">
      w2bPinItButton({ 
       url:"<data:post.url/>", 
       thumb: "<data:post.thumbnailUrl/>", 
       id: "<data:post.id/>", 
       defaultThumb: "https://blogger.googleusercontent.com/img/b/R29vZ2xl/AVvXsEi0d5oTFHgCsT6hJzi_0UFOTD0OrMK-WK8NUTIHoOQYxzoMLxIKj7zbf6lT5K0B_ovtVS9ACTcSMbsKqYvpJtZbxtZRi6Gl7_rw_z7qfN2diZl8_eSCW_RO836ueDIBjiUFi5B7ZlIBbDkM/s1600/w2b-no-thumbnail.jpg", 
       pincount: "horizontal" 
      }); 
     </script> 
    </div> 
    </b:if>
    Settings
    defaultThumbSet the Default Thumbnail Image URL.
    pincountSet the Pin it Count Style.
    Options
    vertical
    horizontal
    none

ADDING STYLINGS

Add the below styling before ]]></b:skin> tag.
.w2bPinitButton{ 
 float: left; /* Customize left/right */ 
 margin-right:10px; /* Customize margin-left/margin-right */ 
 display: block; 
 padding:4px;
}
Customize the Float and Margin properties according to your need.
I hope this Pin it Button is helpful to you. Please share it with your Friends and Leave your Comments. :)


Twitter Updates

 
Support : Creating Website | Johny Template | Mas Template
Copyright © 2011. Blogger Widgets And Gadgets - All Rights Reserved
Template Created by Creating Website
Proudly powered by Blogger